Restore MSSQL database with new name

Restoring old MSSQL database to a new database with different name can be a little bit tricky on Windows. This was done on Windows Server 2008 with SQL Server 2008 Management Studio installed.

Here is how:

  1. Login to your SQL Server Management Studio.
  2. Create new database with name that you wish. In this case, we will create database name “new_database”. Just right click on “Databases” and then “New database”.
    mssqlrestpre1

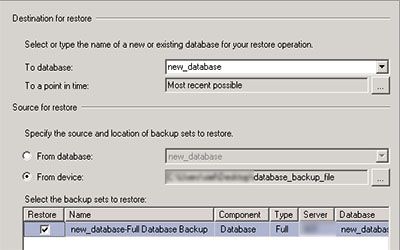
  3. Select newly created database and right click on it, then select “Tasks -> Restore -> Database …” In “Destination for restore”, select database that we created in second step – new_database. Select it from drop down menu “To database”. In “Source for restore”, select  “From device” and then navigate to your database backup file from which you want to restore database.
    mssqlrestpre2 

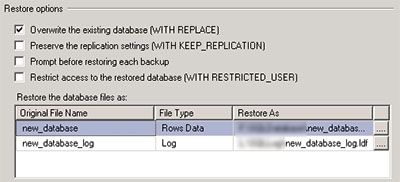
    Also click on “Options” on left side of the window (Select a page). Then check “Overwrite the existing database”. Make sure that you pointed to right database files (Restore the database files as -> Restore As field). When done, click OK. Restore process will start.
    mssqlrestpre3 

  4. Your database should now be restored from your old database backup file to your newly created database new_database.
    mssqlrestpre4

How to transfer SSL certificate from Linux to Windows

Sometimes you may want to transfer your SSL certificate to Windows enviroment. So if you searching for how to transfer and find this article, than I’m sure that you know how to install certificate on Linux or Windows machine. Otherwise there are a million tutorials that you can find on google. I will explain how to transfer your certificate from Linux to Windows.

First, you need to create .pem file. This file must contain private key and certificate hash (.key and .crt). Open your favorite text editor (vi) and paste the content of your key and certificate file in one file. You must paste it in that order with a line break. First key and then crt. Save this file as sslcertificate.pem.

On IIS server you’ll need a file in p12 format. You can simply create p12 file by execute command below on your Linux machine. You’ll have to define password for your .p12 file. Remember this password because you’ll need it later!

openssl pkcs12 -export -in sslcertificate.pem -out sslcertificate.p12 //replace with your attributes

Transfer your freshly created sslcertificate.p12 file on to your Windows machine. You’ll import your sslcertificate.p12 in your IIS. On Windows machine, find properties of your website in IIS and then go into Directory Security tab. Click on button Server Certificate and then select option Import. Than will asked you to find file. You need to change scope to All files as otherwise, sslcertificate.p12 file won’t be visible. When you’ll select sslcertificate.p12 file, you’ll be asked to enter password. Enter the password that you defined in step 3. This is it! You transferred SSL certificate from Linux to Windows.

© 2024 geegkytuts.net
Hosted by SIEL


About author